
Picture yourself waking up in your camper, surrounded by breathtaking scenery. You stretch, head to the kitchen, and when you open the tap, delicious, freshly filtered water flows for an untroubled cup of coffee or tea. Afterwards, a hot shower sends you into a day full of new impressions and experiences, fresh and cozy.
The comfort of an “almost like at home” water supply in a camper is not a wish that can only be fulfilled with a lot of money by buying a “luxury motorhome”. Even in a DIY conversion, a well-functioning water system is no rocket science if you observe a few basic rules. These are exactly the basics we want to look at here, to give you the most important pointers for your project.
We will explain the individual components, their functions and how they are best arranged in the system in detail, and give some valuable installation tips.
Note:
This is explicitly about building a pressurized water system, including hot water and filtration. Of course, depending on how you travel and on the type and layout of your vehicle, such a water system may not suit you at all, and it may make much more sense for you to work with simple, mobile canisters and a small submersible pump, for example.
We want to cover the pros and cons of the different approaches, as well as the possible setup of other systems, in other articles.
Components of the Pressurized Water System
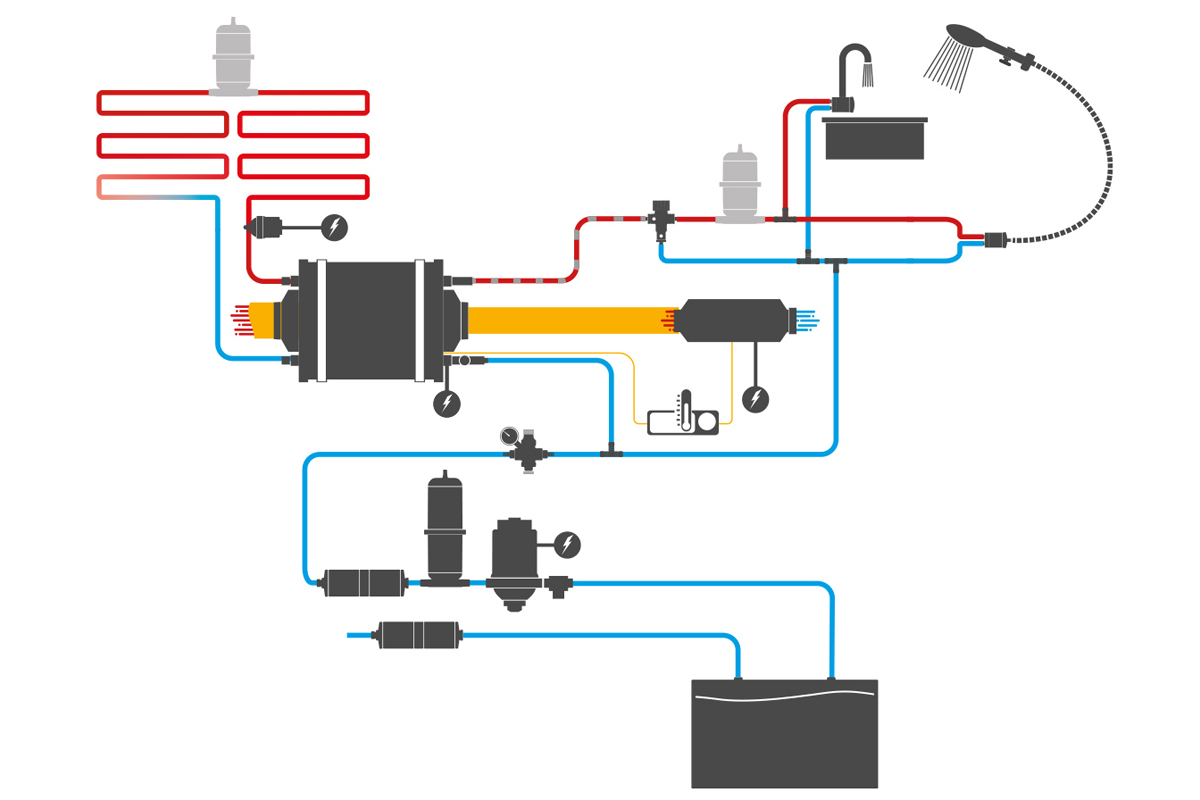
To work our way through the system in our minds, we now go from the fresh water tanks through the components in order, all the way to the water outlets.
You can follow the water’s path from filling to the outlets in this diagram:

Fresh Water Tanks – Selection and Placement in the Vehicle
The importance of choosing the right fresh water tank is often underestimated at first. However, the size, shape and placement of the fresh water tank(s) have a considerable influence on both your self-sufficiency and the vehicle’s handling. Driving safety and even the legal road approval (insurance cover!) can be lost if weights are too high or poorly distributed.
Choosing the Fresh Water Tank
Fresh water tanks come in a wide variety of sizes and shapes, from small, portable tanks to sizes meant for storing several hundred liters of fresh water. When choosing a tank, you should consider several factors:
Capacity
Of course, the size determines how much water you can carry. A bigger tank means less frequent refilling and thus more self-sufficiency, but it also adds considerably to the vehicle’s weight – under certain circumstances you absolutely have to keep an eye on the permissible gross weight (keep in mind that you will want to take personal luggage along even with fully filled water tanks).
The space taken up in the vehicle by one or even several large tanks should not be underestimated either.
Material
By far the most fresh water tanks are made of plastic, as it is light, durable and resistant to corrosion. Make sure the tank is made of a food-grade material that does not affect the water quality.
Because of weight and cost, stainless steel tanks are only used for very special projects with corresponding requirements.
Shape
To make the best use of the space available in the vehicle, there are not only rectangular tanks but also ones designed for specific installation positions. For vans, for example, fresh water tanks with curves for mounting above the wheel arch are a popular option, since that spot is otherwise hard to use sensibly.
Some suppliers have also specialized in making custom solutions.
Placing the Fresh Water Tank
The position of the fresh water tank in the vehicle should be thought through not only with regard to making the best use of space. Also include the following considerations when choosing the right installation spot.
Weight distribution
Water is heavy, and a full water tank can considerably affect the vehicle’s weight. To ensure driving stability and handling, position the tank so that the weight of the load ends up evenly distributed between both sides and (taking the data in the vehicle registration document into account) between the front and rear axle – also consider the weight of built-in furniture and so on.
Accessibility
The tank should be placed somewhere easy to reach. The tank is only rarely filled with water through an opening directly on it, watering-can style, but the opening should definitely be accessible for maintenance and occasional cleaning.
Frost protection
It is important to position the tank, and the entire water system, so that it is protected from frost. Otherwise damage to technical components is inevitable, and leaks then cause water damage in the vehicle itself as well.

Here is how to avoid frost damage when your vehicle stays unused and unheated in winter:
Proximity to other systems
When choosing the location, make sure the lines can be routed as simply and straight as possible.
While the tank has to be kept frost-free, the reverse is also not advisable: don’t install it where it is constantly exposed to a lot of heat (for example right next to a heater without sufficient air circulation), as the heat leads to rapid bacterial growth in the water system.
Hose Lines
From the fresh water tank, the different components of the pressurized water system are connected with hose lines.
Even if it is a big expedition truck: for use in a vehicle, flexible hose lines are definitely to be preferred over a rigid piping system. Hoses offer several advantages in this application:
Why Hose and Not Pipe
Flexibility already makes installation easier and gets you around every corner and angle without effort, and hoses also stay movable afterwards and go along without problems when the vehicle has to adapt to different terrain and road conditions. Vibrations and shocks while driving are absorbed, whereas rigid pipes would tend to crack and break.
The thermal expansion caused by temperature fluctuations can also be flexibly “absorbed” by hoses, whereas rigid pipes can crack and tend to leak at the connections.
Replacing hoses is also much simpler and less work than replacing parts of a piping system. They can be cut and connected easily, they are lighter and cheaper than pipe material. Spare pieces are easy to carry along and fit any spot, whether a straight run or a bend.
Choosing the Hose Line
When choosing hoses for your pressurized water system, there is one important point to note: if the water is used for drinking or cooking, the hose line should definitely have a corresponding drinking water certification. On the one hand, this guarantees a tested material quality that does not change the composition of the water – and, for example, does not release dangerous plasticizers into it.
On the other hand, it is tested how the material behaves with regard to bacteria. If harmful germs like to settle on the inside of the material and so encourage their rapid multiplication, the hose cannot receive a drinking water certification.
So the choice of hose line has a direct influence on your health. You can find out more about this in our article Drinking Water Hose – Look for These Two Certificates!
High-quality drinking water hoses are available in red and blue, so that even years after installation you can tell at first glance which line carries hot and which cold water.

Installation Tips
When routing the hose system, make sure the water can flow freely and no major constrictions occur. Very sharp bends (or even kinks) in the hose system must be avoided. A constriction can also be caused by unsuitable connectors, for example.
Plan the hose lengths carefully before cutting, to avoid unnecessary bends or tension.
Secure the hoses to minimize movement. Use brackets or cable ties to hold the hoses in place.
Protect the hoses from external influences such as chafing on sharp edges or routing them directly past heat sources. If the installation situation requires it, use protective conduit (insulated if necessary).
Tip: Protective conduit is also an excellent kink protection and can be used to guide the hose safely around corners and edges.
Connecting with Clamps
There are quite serious differences between the various types of hose clamps – both in material quality and in installation itself.
Screw Hose Clamps
Everyone knows the “normal” hose clamps that you tighten with a small screwdriver. They are usually cheap to buy, often in assortment boxes with various sizes.
However, they are also often of lower material quality and therefore more prone to rust, and they can easily work loose through vibration – both lead to leaks and possibly water damage in the vehicle.
During installation they have the problem that they do not tighten evenly but exert uneven pressure on the connection after tightening. This sometimes makes sealing harder from the start.
Single-Ear Hose Clamps
Single-ear hose clamps with an insert ring, unlike screw clamps, exert even pressure on the hose. This contributes significantly to a reliable seal.
Single-ear clamps are also often made of higher-quality material. They don’t rust as quickly and don’t work loose through a vibration-prone screw connection.
The downside: you need a special pair of pliers to close them, and the very sturdy connection can only be released again by cutting open the clamping point with side cutters. The clamp is then destroyed.
Clamping Jaw Clamps
A clamp that combines the advantages of screw hose clamps and single-ear hose clamps is the clamping jaw clamp. It is the first choice when it comes to a high-quality connection between hose and nozzle.
Clamping jaw clamps are
- evenly sealing
- re-tightenable
- reusable
- usable with standard tools (screwdriver)
- high-quality workmanship

TIP:
Be sure to take a few hose clamps as spares on your trips. Even with good screw clamps there is no guarantee that you can reuse them if something on your water system ever has to be repaired or changed. It is then that one small thing you will definitely need – and without which it simply doesn’t work.
Where No Clamps Belong at All
Sometimes you can tell the quality of a product by the fact that no clamps are provided at all. At the outlet of a hot water boiler, for example, the connection gets so hot that the hose material can deform slightly from the heat. That is not only bad for the hose itself – the clamp would also have to squeeze tighter as the material softens in order to keep the connection (repeatedly) sealed.
In such situations, metal screw connections are more sensible, together with a piece of hose that cannot deform from heat. On our combiBOIL hot water boiler we have taken this into account and fitted high-quality screw connections instead of a smooth piece of pipe. A G1/2 inch braided stainless steel hose fits onto it, for the heat-resistant connection between boiler and mixer. By the way, it is already included in the delivery of the Hot Shower Kit 2.0, the complete set of air heater and boiler.

To make installing hot water together with an air heater as easy as possible for you: the Hot Shower Kit 2.0 contains all the necessary components and gives you maximum flexibility and user comfort
Sealants
Sometimes threads or nozzles and hoses don’t fit together exactly, even though the size seems to be the same or is stated as the same. This can be due to differences in the units originally used by the manufacturers (e.g. metric / inch), or to manufacturing tolerances.
If everything fits together exactly and suitable material and tools are used (see clamps, for example), the connections will be tight even without additional aids.
Since a tolerance cannot be ruled out, we recommend PTFE thread sealing tape for use on metal screw threads.
Pressure Water Pump
The pressure water pump is the first component connected to the fresh water tank by a hose line. It draws in the water and pressurizes the system.
For the pump to meet the demands placed on it, you should check the following criteria when choosing one:
Flow rate
Often one of the first questions that comes up: can the pump deliver enough water (meaning “per minute”) so that you don’t have to jump from drop to drop in the shower? But don’t worry: you rarely need to fear THAT little flow with pressure water pumps. Most models are in a range of about 9 to 15 liters per minute, and our own tigerexped pump even delivers almost 19 liters per minute. That makes showering, washing dishes and flushing toilets (tip: save water by using a dry toilet!) possible without any problems.
It is important to note that the actual flow rate can depend on various factors – including the water pressure in the system, the condition of the pump and lines, and the specific requirements and settings of the individual system components.
Even though a lot of flow is a nice thing:
Keep in mind that high pressure and flow use a lot of water without corresponding saving measures, and water is only available in limited amounts in a camper. This not only limits your self-sufficiency but, depending on the region you travel in, can also be very impractical – camper-oriented infrastructure with many water taps is not available everywhere.
Water pressure
Besides the flow rate, water pressure plays the decisive role in whether the system is “shower-capable”.
The question of pressure is more important, though, with regard to whether or not you have drinking water filtration. The most common type of filtration, because it is the simplest and most practical, is mechanical, with a hollow fiber or ceramic cartridge and activated carbon. Pushing the water through the tiny pores or openings of the filter takes a certain amount of pressure. If the pressure water pump is too weak, the flow drops rapidly.
Remember:
Water filtration needs pressure, so a powerful pressure water pump.
Note, however, that other components are not designed for high pressures and can easily be damaged by them. Install a pressure reducer to avoid defects and water damage in your vehicle. We will go into the pressure reducer in more detail shortly.
Power supply
Pressure water pumps for campers and motorhomes are available for operation on 12V and 24V on-board systems. Make sure you buy a pump that matches your vehicle’s electrical system.
Noise level
The noise level of the pump can be an important factor, and there are certainly some differences in how loud the pump runs. But you can do the most yourself to make the pump’s operation pleasant. A well-chosen position and the right mounting surface ensure that vibrations and running noise are not carried on to other surfaces or even made worse by them (more tips in our article: Installing a Pressure Water Pump)
Reliability, durability, repairability
A reliable pump is crucial to avoid problems while traveling – because water that is “safe from use” in the fresh water tank, as you can’t get it out any more, can be quite annoying.
Good pumps are designed so that they can be repaired with repair kits when needed – this is admittedly no less annoying at first when something breaks on the road, since you probably don’t have the repair kit with you. However, these pumps are generally of higher quality than cheap disposable items that offer no repair option and are not designed for longevity and sustainability.
Self-priming ability
Check whether the pump can draw in water by itself, as it is often difficult in a camper to mount it below the water level.
Dry-run capability
If a pressure water pump runs without water, it can overheat and be damaged. Pumps that can run dry withstand this load for a certain time and so ensure that the water supply still works reliably after such an incident, without damage or faults.
Size and mounting
Space for installations of this kind is limited in a camper or motorhome. Look for a compact size and, for the greatest flexibility in choosing the mounting location, for the option to mount it in any orientation.
Integrated bypass
An integrated bypass helps to improve performance, service life, energy efficiency and comfort when using the water system.

For installing your pressure water pump, also read our tips on installation and electrical connection in this article:
Pre-Filter for the Pressure Water Pump
To protect your water pump from damage, using a small pre-filter is essential. It prevents sediment and foreign bodies of any kind from getting in, which can cause the pump to fail suddenly or over time.
Important:
The pre-filter is also required to maintain the manufacturer’s warranty, since damage from foreign bodies could clearly have been prevented and is not a fault attributable to the quality of the pump.
If you buy a pump without a pre-filter, you should definitely get one additionally.
Accumulator Tank
An accumulator tank considerably improves the performance, ease of use and efficiency of the water system in the camper and is therefore a sensible and important addition to the pressure water pump.
The accumulator tank smooths out the pressure fluctuations caused by the pump’s (intended) starting and stopping, providing a pleasant, more even water flow, for example while showering. At the same time, the number of starts and stops is reduced, which reduces wear on the pump and extends its service life.
In the order of the components to be installed after the tank, it comes directly after the pump.

Pressure water pump with 18.9 l flow and 4.2 bar pressure for sufficient flow even with filtration
- with pre-filter
- accumulator tank
- plus nozzles
Tip: Optionally, a second accumulator tank in front of the outlets can smooth the water flow even further.
Drinking Water Filter
After the pump pre-filter, pump and accumulator tank, this is the right place for water filtration.
We assume mechanical drinking water filtration here, as it is easy to implement, inexpensive and very reliable in its effect. It is therefore suitable for the vast majority of motorhome travelers and is found that way in most motorhomes.
When choosing a mechanical water filter, look at the following criteria:
Filter type
Choose the right filter type for your requirements. Ceramic or hollow fiber membrane filters can remove sediment, disease-causing germs and impurities from the water. Activated carbon filters are responsible for removing dissolved substances such as chlorine, taste and odor compounds, but also drug residues, pesticides or fertilizers.
Filter fineness
The filter fineness determines which particle sizes the filter can remove. The smaller the pores or openings in the filter, the finer the particles it can remove – the principle is like that of a sieve.
The filter fineness should not be coarser than 0.2 micrometers (2 μm is 0.00200 mm); 0.1 micron would be better.
Flow rate
Pay attention to the flow rate of the filter. It should be enough to still let an acceptable amount of water per minute flow from your outlets.
If you also want to filter the water when filling your fresh water tanks, good pressure from the pump and a sufficient flow rate of the filter are important so that filling does not take an unreasonably long time. This can lead to various problems, for example when a payment system at the water point charges by time rather than by liter. When looking into filter cartridges, there should definitely be corresponding specifications or charts.
Filter service life
Be careful with the stated service life of filter cartridges, as it is only a rough guide. It depends above all on the quality of the water being filtered. If the water is heavily contaminated, the particle filter (which works like a sieve) simply clogs faster.
Installation and space requirements
Many filter cartridges need an enormous amount of installation space. Keep in mind that it is not only the sometimes quite large housing that has to fit at the chosen spot – there must also be enough room to change the cartridge.
Some manufacturers (e.g. Alb Filter) therefore focus not only on high filter quality but also on compact dimensions, which is an advantage given the limited space in a camper.

Certifications
Make sure the filters have certifications from recognized bodies, to be sure they meet the stated performance standards and really retain the germs mentioned in the product description.
Maintenance
Easy maintenance with simple replacement or cleaning of the cartridges makes handling easier and avoids “floods” in the vehicle.
Costs / spare parts
Besides the cost of the basic equipment, the long-term running costs, i.e. the replacement cartridges, also need to be considered. It should also be checked whether individual parts of the basic equipment can be bought separately when needed.

With a certified filter fineness of 0.1 micron and at the same time very good flow, compact installation dimensions and high-quality materials (stainless steel and in part the bio-plastic lignin), the drinking water filters from Alb Filter meet all our requirements for good filtration on the road.
Find out here which of the ready-made filter kits from Alb Filter is exactly right for you:
Pressure Reducer
From this point in your pressurized water system, all following components must be protected from excessive pressure. An adjustable pressure regulator ensures that all parts stay intact and that no water damage occurs in your vehicle.
When choosing one, first make sure that the pressure reducer can be set within the required working range; as a rule, the pressure in a camper is regulated to about 1.5 bar.
A model with an integrated pressure gauge is particularly practical for setting it. This way you can simply set the pressure as desired without a separate check with a measuring device, and you are on the safe side (for exact instructions, see the product). Adjusting the pressure, if required, is also very easy this way.

Besides a durable stainless steel or brass housing, what counts in a pressure reducer is its “inner values”. A non-stick surface on the moving internal parts prevents rapid limescale buildup, which is behind most failures of these devices.
Choosing a high-quality version can also greatly reduce or even avoid annoying running noises (a whistling caused by the narrowed flow) compared to possibly cheaper models.
The option to clean and maintain the device also contributes to a long service life in good products, which avoids trouble on trips and saves money in the long run.
Cold Water Line Before the Boiler
So far we have laid a simple hose line from the fresh water tank, in which the components discussed were arranged one after the other. Now the main cold water line splits in two directions before it reaches the hot water boiler.
One part of the water now flows, as mentioned, into the hot water boiler, where it is heated to provide hot water. The other part of the water stays cold and is used for mixing and for cold water applications.
Boiler
The hot water boiler heats the water fed to it so that it is then available for a hot shower, for washing dishes or other hot water uses. This can be done in different ways, i.e. with different energy sources.
Unlike an instantaneous water heater, a boiler heats a certain amount of water in the so-called “tank” before use, which takes some lead time. In return, the hot water is then available (even without reheating) for a longer time, as the tank is usually insulated, which delays cooling down again.
For use in a motorhome or camper, boilers are definitely preferable to an instantaneous water heater.

You can find out more about obtaining hot water and the possible uses of boilers and instantaneous water heaters here:
Second hot water circuit on the boiler
Integrating a second hot water loop, e.g. for an underfloor heating system or towel radiator, is not standard in the majority of campers or motorhomes.
If you use a hot water boiler that offers this option (such as the combiBOIL shown in the picture above), this extra bit of living comfort is nevertheless easy to implement.
To make operation of the second water loop functional and safe, the following aids are required.
Circulation pump
A circulation pump is required to circulate the water in the second heating loop.
In the case of a radiator, circulation could even be solved by gravity with proper planning – but keep in mind that even parking on uneven ground can be enough to put the system out of action.
When choosing a suitable circulation pump, besides important data such as output and head, also look at what the manufacturer states as the noise level. Circulation pumps can be quite loud, so the decibel figure can be a decisive criterion.
Expansion vessel
An expansion vessel is an important part of a closed hot water system, as it serves to ensure pressure equalization and safety in the system. Using an expansion vessel is mandatory in the case of the second hot water loop. Otherwise thermal expansion can cause overpressure with leaks or defects on other components.
Second Water Circuit as Integration into the Vehicle’s Cooling Circuit
The vehicle engine’s cooling circuit can also be connected to the boiler as a second water circuit. Note here that, because of the pressure conditions, the coolant can reach temperatures above 100°C and so must not be fed into the boiler. Please use a safety valve or take other suitable measures to avoid dangerous steam formation and the boiler’s safety valve blowing off.
Until then, feel free to email our technical support if you need advice on this.
Thermostatic Mixer
A thermostatic mixer (or scald protection) does exactly what its name says: it protects you from scalding by water from the line that is too hot.
Depending on the heating method and the device chosen, the hot water temperature leaving the boiler can be more than 85 degrees Celsius. Without cold water being mixed in, this would cause severe burns if you simply turned on the tap and held your hand under it. The thermostatic mixer pre-mixes cold and hot water before it even reaches your mixer faucet, where you can then regulate the temperature further.
Without a thermostatic mixer in the system, however, not only is very hot water present at the outlet – the hot side also has a higher pressure than the cold side. As a result, when you open the tap, first a rush of very hot water comes out and it takes a long time at the mixer faucet to adjust until a usable temperature is reached. And that is not only annoying, it also wastes unnecessarily much water, which is, as we know, only available in very limited amounts in a motorhome.
So what arrives at the thermostatic mixer is not only the water line from the boiler but also the part that we branched off before the boiler with a T-piece and which therefore stays cold.
Thermostatic mixers are adjustable within a certain range. It is quite possible, and sometimes seen in practice, for it to be set directly to a comfortable temperature for showering, so that mixing hot and cold water with a mixer faucet at the shower is no longer needed. The downside is that the water cannot be quickly readjusted if the temperature seems too cold to you in the moment.
TIP:
Move the adjustment wheel of the thermostatic mixer from time to time after installation, when servicing your pressurized water system.
Regular cleaning of the system is also important, to maintain a hygienic condition and to prevent malfunctions caused by deposits and contamination. You can find a short guide on this here:
Outlets
The cold and hot water lines (after cold water has been mixed in by the scald protection) now reach your outlets, and with them the faucets in the kitchen and bathroom, as well as the shower, possibly an outdoor shower connection or further outlets and consumers (e.g. a washing machine).
It is of course up to your personal preferences whether all points are supplied with hot and cold water, or whether certain points are perhaps only supplied with a cold water line.
As a rule, faucets have a connection for hot and cold water, and the hot water connection can be capped if necessary.
Conclusion
Building a pressurized water system is not particularly complicated. Once you have understood how the individual components work, the arrangement is logical and, with a little manual skill, can be done without problems even by a layperson. No difficult settings have to be made and no specific expert knowledge is needed.
What matters is the combination of components that fit together and the use of high-quality material, to protect both the vehicle from water damage and your health from the introduction of harmful substances.
Under these conditions it is possible to enjoy a water supply in a motorhome, camper or boat almost like in a permanent home – including “luxury elements” such as underfloor heating.
Did this article on building a pressurized water system help you? Then help friends and like-minded people too, and share this info with them:
You might also be interested in this:
