
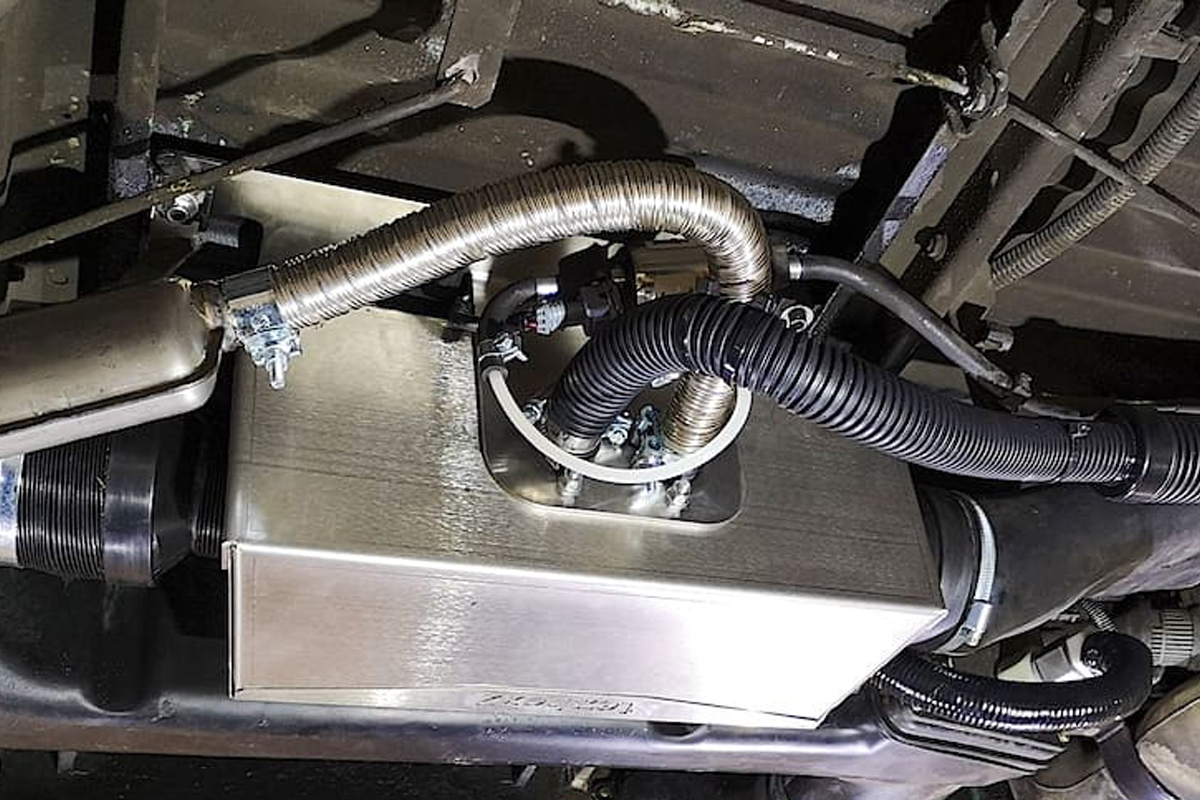
Step by step to replacing an old Eberspächer auxiliary heater – here’s how. TÜV-compliant, even as a DIY conversion without a specialist workshop!
Eberspächer Auxiliary Heater in the VW T4
Depending on how it was originally ordered, the VW T4 came with a factory-fitted auxiliary heater and air ducts routed through the body. After years of use, the combustion chamber is worn out and the heater has to be replaced.
Here you’ll find an affordable solution for replacing the original Eberspächer 3DL. With the Autoterm Air 2D (formerly Planar) and the tigerexped installation kit, you get an auxiliary heater with an e-mark approval (it can be installed by non-specialists without a separate TÜV inspection) and everything you need to do the installation easily, safely and properly.
Introduction / Disclaimer
This documentation was created in collaboration with Hendryk from vanmonkey. It shows how to use the tigerexped installation kit for the T4, together with an Autoterm Air 2D air heater (included in the installation kit).
Anyone who installs or modifies technical equipment themselves does so at their own risk; we cannot give any warranty for work we did not carry out ourselves. The text and pictures are meant as inspiration. Experience in working with vehicle technology is absolutely necessary!
What Do I Need?
It’s actually quite simple: our installation kit with the included heater and, VERY IMPORTANT: the original Eberspächer D3L including all air ducts, as fitted at the factory.
This installation kit is intended for installation in a VW T4 WITH the original heater, whose combustion chamber is worn out and which is now to be replaced easily and in a TÜV-compliant way.
If you don’t have an original heater, or at least all the original air ducts, this installation kit is not for you – unless you know exactly what you’re doing and like to tinker.
What’s in the Installation Kit?
- An Autoterm Air 2D air heater with original accessories, e.g. silencer, wiring harness and a control panel (selectable from several)
- The tigerexped underfloor heater bracket made of stainless steel, with bend-out tabs for mounting the pump, silencer and cable
- A few adapters, pieces of air duct pipe in various diameters and clamps, so the original air ducts can be used.
- The special stainless steel heater bracket, modeled on the original but shifting the heater position so that a connection as described above is possible.
- Our stainless steel installation box TEXBOX2, which together with the bracket forms the basis for an underfloor installation on the T4.

Complete Installation Kit for VW T4
With Autoterm auxiliary heater and accessories,
stainless steel bracket and
stainless steel installation box TEXBOX2
What Else Do I Need?
The original rubber mounts between the heater bracket and the body are sometimes beyond saving – if you already know that, get replacements right away.
An idea for routing the cable into the interior: it can be done just like the original, but you have to seal the hole in the air duct somehow. You could saw up the original wiring harness for this, but it’s better sold in one piece!
Normal car tools for mechanical and electrical work.
Optional: extension cable for the control panel up to 7 m. Originally, the control panel can only be placed 1.8 m from the heater – depending on your interior layout and personal ideas about reachability, that is too short.
Also optional: additional temperature sensor with 5 m cable. This is used when the control panel and the temperature measuring point are to be separated. You can also use it to monitor and control a second heating zone, e.g. in the pop-top (with the PU-27 and Autoterm Comfort Control control panels).
Replacing the Heater in the T4 Underfloor – Step by Step
Step 1: Removal and Preparation
First we remove the original package and put it on the table. To do this, unscrew all hoses from the heater and take down the heater together with the intake air duct, in one piece with the heater bracket (4 screws on the rubber-metal mounts).


Step 2: Assembling the Intake on the Table
We detach the air duct from the heater bracket and start the new assembly. Put the heater into the TEXBOX, route the cable out through the cable entry gland, fasten the box with the heater to the bracket and attach the 4 rubber mounts to the bracket as on the original.
The result looks roughly like the left picture here.
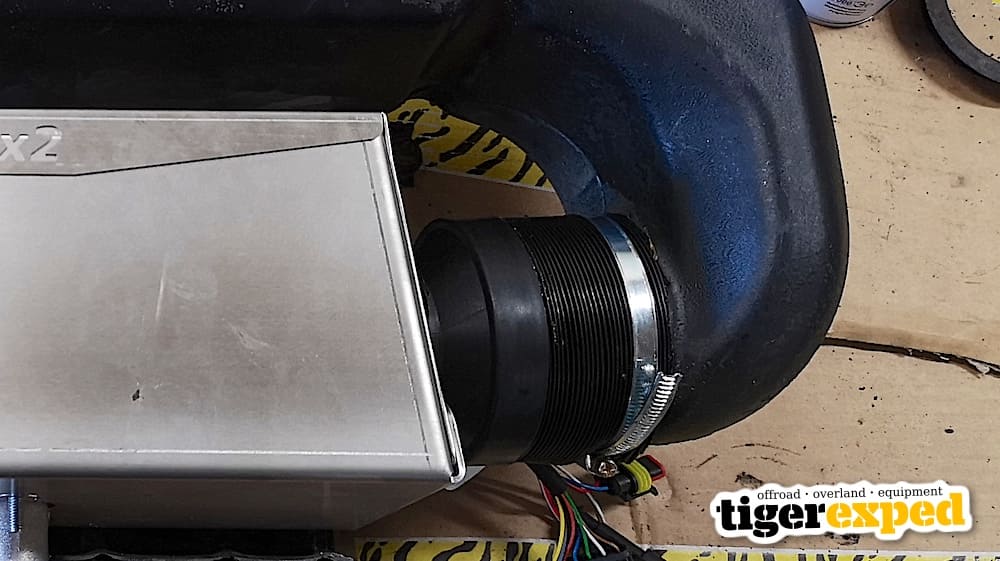
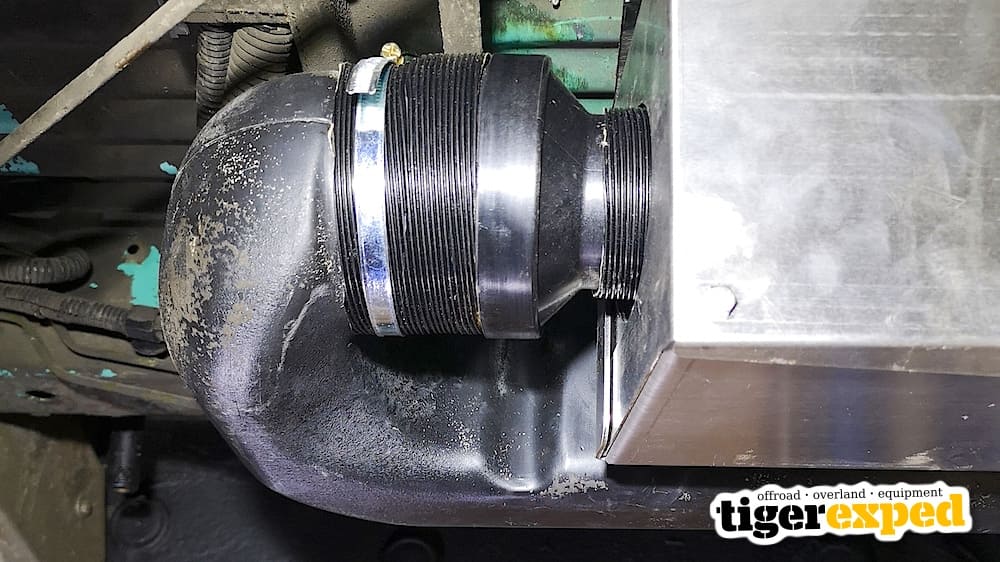
To fit the air ducts you need 2 short pieces of 90 mm connecting pipe, which we make by sawing up the supplied 90 mm pipe connector (see right picture).


The sawn-off pieces are each screwed into one of the two 60-90 adapters (screw them tight with the ribbed side in the adapter). On the intake side, the connection is made with a piece of 60 mm pipe on the heater side and then a piece of 90 mm pipe on the air duct side.
If you choose sensible lengths, almost nothing can slip. The only critical spot could be on the air duct side, which is why we use one of the supplied stainless steel clamps here. It should look roughly like this:
Step 3: Installing the Autoterm Air 2D in the VW T4
You can now hang the package back under the vehicle. If necessary, ideally you will already have treated and sealed the target area against rust.
The 4 small brackets would have to be retrofitted by anyone who bought air ducts separately.
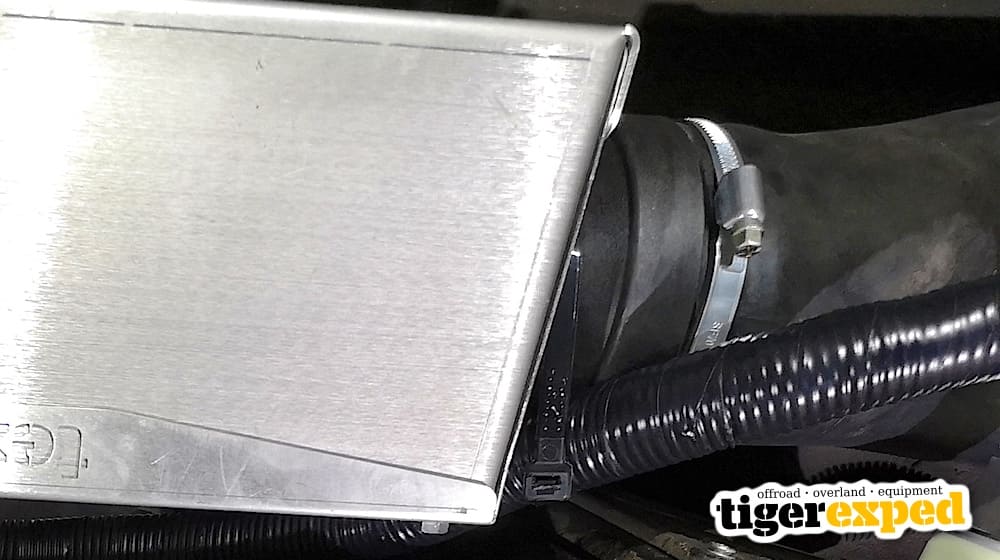
On the other side an air duct is still missing: here the adapter with the inserted pipe piece is pushed directly into the duct and secured with a supplied clamp. The rest of the way to the heater is bridged with a sufficiently long piece of the 60 mm air duct pipe.

Step 4: Completing the Assembly
Now only the usual steps of a heater installation are left: fit the exhaust, fit the intake silencer, and screw the new fuel pump (don’t reuse the old one!) to the small tab on the bracket.
Please make sure the fuel line does not touch the exhaust.
The wiring harness comes completely pre-assembled. Professionals can shorten it – professionals, because there is no warranty on damaged wiring harnesses or any damage resulting from them. So you should know what you’re doing and be sure your wiring harness still works afterwards.
Step 5: Cable Entry into the Interior
The cable entry can be done in different ways. These are the most common scenarios:
- The previous owner has already botched the wiring harness and it can’t be sold: then you can try to take it apart and route the new harness the original way, through the original opening in the air duct. That would be an elegant way to deal with the situation and get a nice result.
- Your wiring harness is in good condition and the heater and heater bracket are there too – you may want to sell everything in one piece rather than take original parts apart unnecessarily. In this case you of course have to make your own entry. Depending on your skill, however, this can also lead into the interior very elegantly along the original route.
- You have nothing at all and don’t want to tinker forever: seal the original hole in the air duct and route the wiring harness into the interior in a completely different way.
Done!
Final Tips and Download for Converting the Eberspächer Auxiliary Heater in the VW T4
However you do it, the result should end up looking roughly like this and give you many years of enjoyment.
Please once more make sure that the fuel line and the exhaust are always far enough apart and cannot touch each other.
If possible, route the exhaust and the intake in the same direction, so that the same pressure conditions act on both pipes even when parked in the wind (in the picture this may be solved suboptimally!). Never route either the exhaust or the intake facing the direction of travel.
What else you need to watch out for when installing an Autoterm auxiliary heater and its accessories: you’ll find detailed information from the manufacturer in this installation manual.
For van drivers with some experience in “wrenching”, converting from an Eberspächer to an Autoterm auxiliary heater with this installation kit is very doable yourself.
If you don’t trust yourself to do the installation, please turn to one of our installation partners. Please keep in mind: installation partners usually order the heater and all the parts they need for the conversion directly from us themselves!
Thanks
Thanks again to vanmonkey for the photos and above all the tests beforehand. He heroically installed and removed everything in his van at least 17 times, provided measurements and tried out parts. As a result, the first prototype of the heater bracket fit right away, even though we didn’t have a T4 ourselves – modern product development via Instagram and DHL makes it possible!
Adventure “Auxiliary Heater Conversion in Las Vegas”
Kathrin and Marc from SyncroTime replaced their old Eberspächer during their trip through America and shot a video series about it.
If you ever want to convert an Eberspächer auxiliary heater to an Autoterm Air 2D yourself, we can warmly recommend this little installation documentary.
You might also be interested in these articles on auxiliary heaters!