Based on experience, we want to point out a few recurring installation mistakes here, and to compare correct and unfavorable installations of Autoterm Air 2D and 4D (formerly Planar) air auxiliary heaters.
This information does not replace the installation instructions! Please follow the detailed notes in them for flawless operation.
Air Ducting
Do
- Straight air ducting, gentle bends if necessary, to avoid heat build-up in the heater (leads to the heater reducing its output or shutting down completely)
- Distribute via Y-pieces (see the accessories for warm air distribution in the shop)
- Keep the throughput (duct diameter)
(possibly increase it; note that this changes the flow pressure) - Ensure unobstructed air flow, avoid flow resistance
- The same applies to the intake side.
Don’t
- Sharp angles in the air ducting
- Hard splitting of the air ducting with T-pieces
- Reduce the throughput (using narrower duct diameters than intended for the respective heater)
- Although far less relevant in practice, the same applies to the intake side.
All of this can cause turbulence and slow down the air flow. With heat build-up, the heater will throttle down or switch off.
Drawing in Heating Air from Outside
Do
- If at all, then preferably with a control flap and only if it is ensured that clean, exhaust-free, dry air is drawn in!
Also read: Installing the Control Flap Correctly – How to Steer the Warm Air in Your Camper
Don’t
- Preferably do not draw air in from outside! Exhaust, dirt, fog etc. could be drawn in from outside.
- The heater runs more efficiently, i.e. more economically and therefore also more quietly, on the recirculation principle with room air.
- To get rid of stale and humid air, we recommend proper ventilation.
Fuel Draw-off
Do
- Place the supplied fuel pickup tube or Fuel Fix in the vehicle tank.
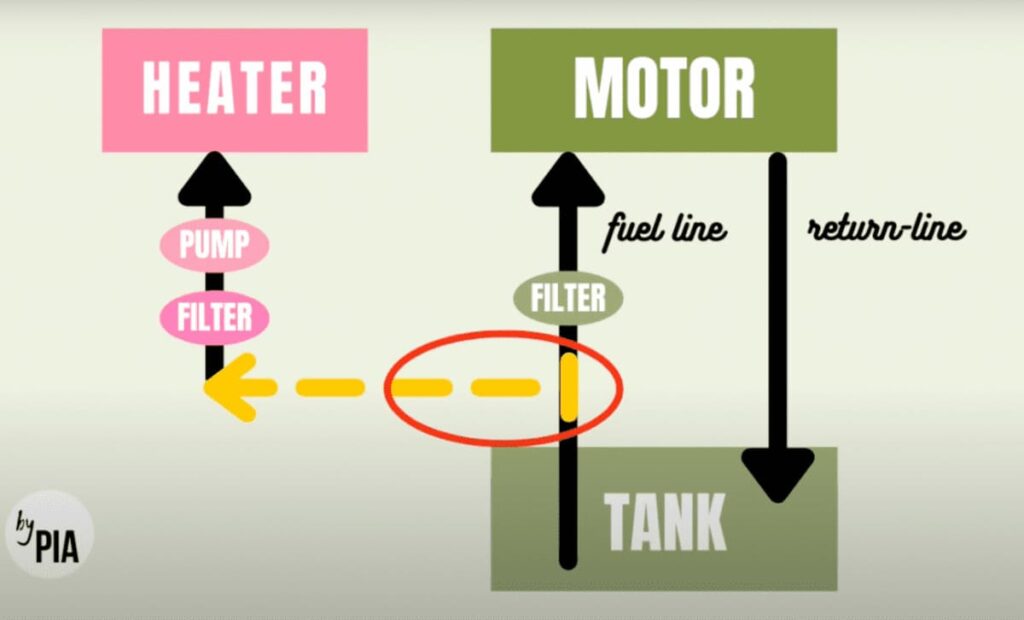
- Put a T-piece on the fuel pickup of an existing supplementary heater.
- Put a T-piece on the return line or, if applicable, the supply line, only if the system and pressure conditions are known and suitable (see the following guest article: 5 Reasons Against a T-Piece).
Don’t
- Just put in a T-piece out of convenience and without background knowledge.
- Put a T-piece on a return line that is too short (the heater gets no fuel as soon as the tank is a bit emptier).
- Put a T-piece on a supply or return line that is under pressure (severe malfunction, danger and smoke if the heater is flooded with diesel).
Underfloor Mounting
Do
- On the T5/T6, where the protected installation location and air ducting are prepared at the factory.
- Well protected from moisture and dirt (e.g. in a TexBox2).
- Drawing in room air from inside, for the reasons given above – so with 2 holes in the vehicle.
- Air ducting in long bends, although valuable heat may be lost in the process.
Don’t
- On most vans, where the air ducting is not prepared and no protected underfloor installation location is provided.
- Even stainless steel boxes (TexBox2) offer only limited protection. Caution: off-roading and water crossings are not possible even with one without risking damage to the heater!).
- Drawing in room air outside under the vehicle is a hazard (exhaust)!
- A 90-degree bend from the heater up into the vehicle. That would be the shortest way, but it does not work in terms of flow (see air ducting).

Here you will find our detailed articles on underfloor mounting:
Mounting with Installation Flange
Do
- Mount the heater with an installation flange on the vehicle floor* (simplifies installation, ensures the unit is free of stress and thermally decoupled from its surroundings).
- Seal the edge of the flange with Dekasil MS-1 (https://www.tigerexped.de/dekasyl-ms-1 ) or a similar sealant. This way the exhaust & diesel line are sealed outside, while the heater itself sits protected inside and can work on the recirculation principle.*
*) applies to road vehicles, not to marine applications
**) Even when installing in the engine compartments of boats and yachts, the room air intake must not be in the same room as the exhaust connection.
Don’t
- Free-floating installations in the interior where the exhaust pipe connection to the heater is inside and there is a risk of CO2 escaping into the interior. Exhaust belongs outside and spatially separated from the room air intake! **
- Do not bridge the cut-outs around the bolt holes on the flange with washers. The semicircular cut-outs serve for thermal decoupling.
Pump Mounting
Do
- Don’t forget to bleed it properly
- Mount it decoupled, as free-floating as possible (securely “suspended”)
Don’t
- Fasten it rigidly to body parts that transmit vibration, without a vent. This transmits the mechanical clicking of the pump to the vehicle, which will be disturbing and annoying.
Sizing
… Actually not an installation topic, but still worth mentioning when planning the installation. Also read our thoughts on the right heater sizing in our article on the TWIN kit.
Do
- Calculate the room volume to be heated realistically (minus cabinets, benches etc.)
- Define the predominant(!) usage time of the heater (what percentage does winter camping take up compared with the shoulder seasons?)
- Insulate the vehicle properly (keep in mind condensation in uninsulated vehicles and surfaces)
- Keep the vehicle at temperature, don’t let it cool down. (The heater can and should keep running; this is better for the heater’s service life and more energy efficient than constant restarts)
Don’t
- Oversizing (if the heater runs permanently on a low level, the combustion chamber will soot up; if the heater still has too much output at its lowest level, it gets warmer than you like, especially in the shoulder seasons)
- Sizing for the extreme case that only rarely occurs (for the vast majority of the remaining time the heater is not sized correctly, which can lead to damage to the heater and annoyance for users)
- Compensating for missing insulation with heating power (condensation in the living space)
- Frequent switching on and off, letting the vehicle cool down (inefficient and repeatedly low combustion chamber temperatures, which promote sooting)
Did these notes on auxiliary heater installation help you? Share them with like-minded people!
These articles on auxiliary heater installation are sure to be interesting for you too!