

To make it as easy as possible for you to build out your camper, we offer kits and complete sets for all kinds of needs. Since the 99% Camper, 1% Camper and Hot Shower kits partly overlap, here is a detailed side-by-side look at what is included in which kit.
Heating vs. Heating + Hot Water
It is actually quite simple:
Our Camper Kits are heating sets. There is the 99% Camper Kit, which, with its 2kW of heating power, is enough for 99% of all campers.
The 1% Camper Kit is also a pure heating kit, but with double the heating power – unlike the kit mentioned before, only about 1% of all campers need it. Hence the names of the two.
Since these two kits were developed, the TWIN Kit has also proven to be ideal for many applications, a combination of 2×2 (TWIN = as in twins) kW of heating power.
By the way, this article helps you assess whether you are better off with 2, 4 or 2x2kW of heating power: TWIN 2-Kit Auxiliary Heater System – The Optimum for Long-Distance and Long-Term Travel.
Besides the components that are absolutely needed for it to work, the heating kits also include a standard selection of materials to complete the installation. The “install a heater” project can therefore be considered finished and done.
The Hot Shower Kits, on the other hand, are heating + hot water solutions.
The most obvious difference, of course, is that besides the heater they also include a boiler and its connection material.
Besides these two main components, these more complex systems contain everything needed to connect them into a safe, reliably working unit. Standard installation material to complete the installation, however, would go beyond the scope here, as the possible installation variants are simply too different.
Besides the practical kits, our shop of course also offers all parts individually. That way you can decide completely flexibly, part by part. The only thing that is sensibly always included: the mandatory installation material of the auxiliary heater, which is therefore always supplied.
First Overview
The following table gives a first impression, which we will then go into in more depth, along with information on optional accessories and on the correct use of all the parts.
| Autoterm Air 2D/4D heater | 99% and 1% Camper Kits | Hot Shower Kits | ||
|---|---|---|---|---|
| 1 | Heater (included by the manufacturer: 2, 3, 4, 7, 9, 11) | ✅ | ✅ | ✅ |
| 2 | Altitude kit | ✅ | ✅ | ✅ |
| 3 | Extra-quiet fuel pump | ✅ | ✅ | ✅ |
| 4 | Fuel pick-up tube | ✅ | ✅ | ✅ |
| 5 | Additional T-pieces for fuel line | ❌ | ✅ | ❌ |
| 6 | Fuel filter | ❌ | ❌ | ❌ |
| 7 | Exhaust silencer (outside) | ✅ | ✅ | ✅ |
| 8 | Schlafgut silencer | ❌ | ❌ | ❌ |
| 9 | Required cables and lines | ✅ | ✅ | ✅ |
| 10 | Optional extensions, temperature sensors, etc. | ❌ | ❌ | ❌ |
| 11 | Heater control panel | ✅ (three to choose from) | ✅ (three to choose from) | ✅ (Autoterm Comfort BOILER Control) |
| 12 | Air duct, distribution, 2 air outlets | ❌ | ✅ | ✅ |
| 13 | Adapter for air duct | ❌ | ✅ (if needed) | ✅ |
| 14 | Installation flange for floor mounting | ❌ | ✅ (2 to choose from) | ❌ |
| 15 | Water-side connection material, scald protection, etc. | ❌ | ❌ | ✅ |
| 16 | Pressure reducer | ❌ | ❌ | ❌ |
Autoterm Air Heater – What You Get
Every Autoterm Air heater comes from the manufacturer with everything it needs to run.
That of course includes the heater itself. Since the end of 2018, all Autoterm air heaters are delivered as standard with an altitude kit for operation at up to 4,200m above sea level.
A control panel is just as mandatory, because otherwise the heater cannot be operated (apart from emergency start). Several control panels with different feature sets are available to suit different needs.

We have put together a direct comparison of the control panels to make your choice easier.
A wiring harness, fuel line and fuel pick-up tube, intake and exhaust pipes including a silencer for the combustion air, and an extra-quiet Advers diesel pump are also included in the scope of delivery.
On top of that comes further installation material, such as exhaust insulation, clamps, fuel connectors, cable ties, etc.
Installation tip:
Bleed the diesel pump vertically first and only then fasten it at the specified angle. Any residual air could otherwise keep the pump from running truly whisper-quiet.
These are the Autoterm heaters of the “Air” series (air auxiliary heaters)

Autoterm Air 2D – with 2kW of heating power, enough for most applications. Available for 12 and 24V systems and with 1 of three control panels to choose from.

Autoterm Air 4D – with 4kW (at least 1kW!) of output, designed more for large or poorly insulated vehicles. Available for 12 / 24V and with 1 of three control panels to choose from.
The scope of delivery of the heaters discussed here is included in both the Camper Kits and the Hot Shower Kits. It cannot be changed, because these are sealed sets from the manufacturer, Autoterm.
Note: the control panel is not in this sealed heater box. It is placed separately in the shipping box. When your delivery arrives, make sure the small box with the control panel is not accidentally thrown away with the packing material.
Optional Accessories for Fuel Pick-up
As mentioned, every heater comes with an Autoterm fuel pick-up tube as standard. To install it, you have to get access to the vehicle’s tank or the fuel sender cover. On some vehicles that is quite easy, on others it takes more effort.
Webasto Fuel Fix
If the tank is hard to reach on your vehicle model, a Webasto Fuel Fix can be a big help. Compared with the Autoterm tank sender, it has the advantage that you only need to get at the tank from above / outside. The supplied drill carries the chips outward, and in this variant the fuel pick-up tube locks itself in place on the inside.
The Webasto Fuel Fix is in any case optional extra accessory and is not included in any of our sets.
T-Pieces
In some installation scenarios, however, T-pieces can be used to split the fuel line, or to simplify the fuel supply.
Two fuel-resistant T-pieces in different sizes (5.3 x 5.3 x 5.3mm and 8 x 5.3 x 8mm), including clamps, are included in the Camper Kits.
Fuel line that can be cut to suitable lengths is also included for fitting the T-pieces. You will find the fuel line in the heater package.
Note: T-pieces cannot simply be fitted into the fuel line in every vehicle.

Our guest author Pia has described very well in this article the 5 cases in which you must not use a T-piece and have to fall back on the fuel pick-up tube:
The Hot Shower Kit includes no T-pieces.
Diesel Filter
Diesel filters are no longer included in our kits, as too many customers had no need for one.
If vehicles in our latitudes are fueled from trustworthy sources, running the heater without a filter is perfectly fine. If the fuel comes from stored canisters and tanks (especially on boats), or if overlanders fill up on their travels from questionable sources and cola bottles, a filter is strongly recommended.
It has to be installed properly, otherwise it can be responsible for malfunctions and Error 13. When installing, pay attention to the flow direction (arrow on the filter) and make sure no air can get into the system or collect in the filter.
To install it you need the following individual parts:
- The filter
- 4x Mini clamp-jaw clamp
- Fuel hose as a connector (or split the pieces included in the heater set)
Optional Accessories for Noise Reduction
A silencer for the combustion air of the air heater comes with every heater and in all our kits. It muffles the “hissing” noise outside. If you want to pull out one more stop, you can consider the Super Silent silencer.
Schlafgut Silencer
For many heater users, however, what matters much more is the noise of the running heater inside the vehicle – especially if you want to sleep with the heater on. Here the Schlafgut silencers are the means of choice. They dampen the fan noise of the air circulation, which every air heater inevitably produces. Mounting the heater as far away as possible or underfloor does not help, because the noise is carried perfectly through the duct with the warm air.
The Schlafgut silencers are integrated into the heater’s air ducting, in short: “plugged in between” and do a considerable job, as you can see in the following video (note, you are seeing a heavily bent silencer here – please bend the silencer in your build only minimally, if at all!
The silencers do, however, have a considerable length of 44cm at a diameter of 13cm (for the Autoterm Air 2D), or even 64cm at a diameter of 14.5cm (for the Air 4D). For many – especially smaller campers – that is a space problem and they simply no longer fit. For this reason they are not included in any of our kits but are optional accessories you can order separately. We can warmly recommend them to everyone who has the space for them.
In that case the silencer should be installed on the intake side of the heater, because that is where the fan is, which is responsible for the noise. The Schlafgut silencer can also be integrated into the air duct on the outlet side, though, and still has an immense effect there. Either way, the silencer should sit as close to the heater as possible.

If you are installing a Hot Shower system and want sound damping, you should plan a Schlafgut silencer on the intake side in front of the heater. On the warm-air side the boiler follows after a short distance, which itself has a damping effect. The silencer also has to be ordered separately with the Hot Shower Kit.
Here you get the silencer for the Air 2D and for the Air 4D directly with matching mounting accessories. These Schlafgut kits are intended for the intake side of the heater and, if needed, come with a piece of air duct as an adapter for the intake side (to connect heater and silencer) and a clamp that fastens the duct to the silencer.
If you miss the Schlafgut connecting duct in your delivery, that is because our air duct is sold by the meter and several meters are already included in the Camper and Hot Shower Kits. Nothing is cut up when packing; it is added together and left in one piece. You can simply cut off the piece you need as an adapter with a sharp knife.
Note: the clamp is meant for the silencer. Please do not use a clamp on the heater itself, as it is easy to tighten too much and distort the heater housing. The heater has a small locating notch for the corrugated duct.
Optional (Extension) Cables and Temperature Sensors
The cable from the heater to the control panel included in the heater set is 1.80m long. If your chosen mounting location for the control panel is farther from the heater, there are the following options.
Control Panel Extension Cable
You can use a 7m cable to replace the supplied cable. That way no additional plug connections are created.
Alternatively, you can extend the 1.80m cable with one of three extension cables to choose from. Either on the heater side at the large plug with a 3m or a 5m extension cable.
On the control panel side, a 2.60m extension cable can be connected to the control panel’s small cable.
Temperature Sensor
The Comfort Control control panel has a built-in temperature sensor.
An additional external temperature sensor is recommended if the control panel’s mounting location cannot provide a good reference value, because it sits either directly in front of a warm-air outlet or in a spot where you spend little time.
An additional sensor can also make sense if, for example with pop-up roofs or sleeping areas farther away, you want to measure there at night in order to regulate the temperature control accordingly.
The Simple control has no built-in temperature sensor; here the separately ordered sensor is mandatory for regulating to a specific temperature, otherwise the heater regulates in power mode.
Warm Air Distribution
The following parts for warm air distribution are included as a standard selection in the Camper and Hot Shower Kits.
Whether and how much air duct and distribution is needed differs from case to case. The heater can also be operated entirely without them, which is why no air duct is included in the manufacturer’s scope of delivery.
We have, however, added to our kits a standard, mostly sufficient amount of duct (3m), a Y-distributor and two air outlets. Adapters are also included if needed.
The warm air ducting must in any case be designed so that flow resistance and heat build-up back into the heater are avoided. That means: please plan no sharp angles or even 180-degree turns, do not reduce the air flow (by switching to a smaller duct diameter), etc. The credo is: less (air duct) is more. In that sense, the Camper Kit accessories supplied should be sufficient in most cases.
Gentle bends and Y-distribution are of course fine. But Hot Shower systems in particular should be planned as straight as at all possible, with a recommended 50cm distance between heater and boiler.
Extra tip on warm air routing
To influence air circulation through the room, you can also work deliberately with the heater’s intake and, for example, set an (additional) air outlet at a designated spot as an “air inlet”. Put plainly: blowing out at front left and drawing in at rear right means the warm air circulates across the room all by itself, and you often do not have to put an air outlet in every corner. Always depending on the build and the size of the room, of course.
Here you will find the full range for air routing and distribution directly in the shop
Note: the 4D needs different adapters on the warm-air and intake sides; the adapter for the warm-air side is included in the Camper and Hot Shower Kits.
Installation Flange
Note: an installation flange is included in the Camper Kits, but not in the Hot Shower Kit.
The installation flange or other mounting brackets make installing the heater easier, because the heater fits the bracket exactly and so saves you drilling and sealing seven holes of different sizes at the right spacing. However, different road and water vehicles, or mobile solutions such as heater boxes, have very different requirements.
That is why Autoterm delivers its heaters without a bracket or installation flange.
Our Camper Kit is explicitly intended for installing the heater in a road vehicle and therefore includes an installation flange for mounting on the vehicle floor.
Since the Hot Shower Kit is used both in vehicles and in the marine sector (and the latter prefer not to have holes in their hulls), no flange is included in the Hot Shower Kit.
Anyone installing a Hot Shower system or who has chosen a single heater set can choose as accessories from several different flanges for vehicle floors or sandwich panels, as well as various brackets, e.g. L-shaped or U-shaped.


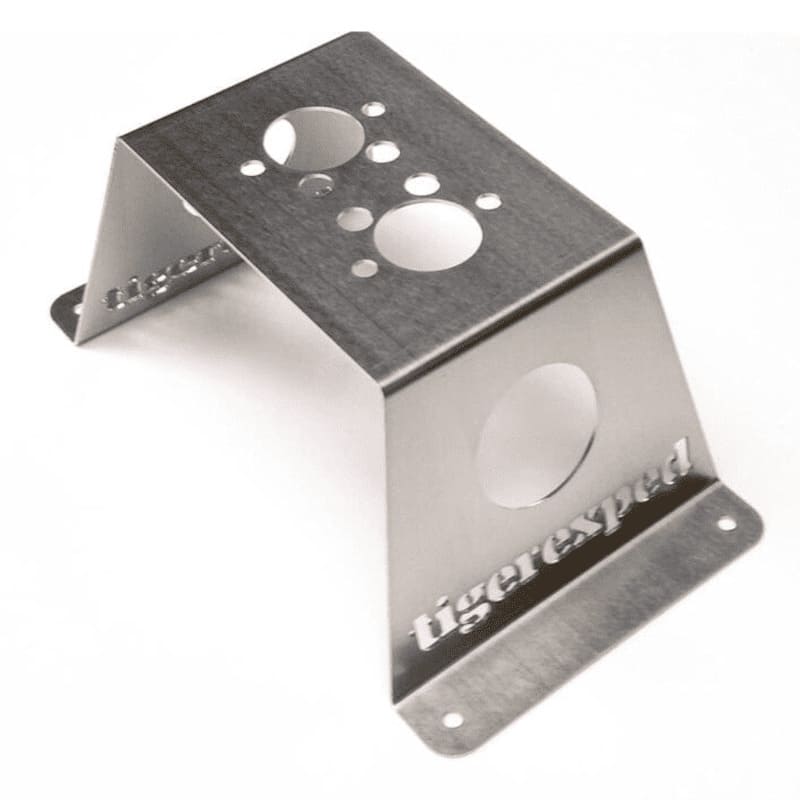

Note, important installation instruction:
Exhaust gas must be sealed off to the outside so that it does not get into the interior. Please do not plan / build “free-floating” heater installations with L or U brackets in the vehicle (living space) where the exhaust outlet, which is fixed to the heater, does not protrude to the outside – this can be life-threatening! These brackets are suitable for engine bays, lockers or similar on boats, as well as for heater boxes that stand outdoors.
Besides the brackets shown here, we have developed further heater brackets for VW T5/T6 and a special VW T4 use case, which we offer in the corresponding installation kits. For the Autoterm Air 2D we also have a stainless steel box, our TEXBOX.
Water-Side Accessories in Hot Shower Kits
Hot Shower Kits contain further parts for integrating the combiBOIL hot water boiler into the vehicle’s existing – or independently planned – water system.
The most important feature here is a pre-mixer as scald protection, plus further parts such as hoses, clamps, etc.
The safety valve that was needed in the past is now integrated into the combiBOIL.
Accessories to Order Separately
As explained further above, the Hot Shower Kit contains all components to connect the heater and boiler and to integrate them safely into a water circuit. Builders’ needs in this periphery vary considerably, and we offer further parts to complete the overall system as optional components, in some cases in different versions. The following parts in particular are worth mentioning for operating the system, or are needed in one form or another.
Pressure Reducer
Anyone installing a pressure water system or a submersible pump with a check valve (so about 99.9% of all users) needs a pressure reducer, because, among other things, the boiler is not designed for high pressures.
We offer adjustable pressure reducers with pressure gauge or without a gauge.
Water Pump
To get the water circulating in the system, a pump is indispensable. From us you get a pressure water pump with excellent pressure that is also suitable for the satisfactory operation of drinking water filters. You also get the matching screw-on hose connectors and, optionally, a matching accumulator tank so that your system runs even more quietly and evenly.

Bundle of pressure water pump and accumulator tank – complete with screw-on hose connectors and pre-filter. Available for 12 and 24V systems.
On the topic of planning and building a pressure water system and installing a Hot Shower Kit we have further magazine articles with important info for you:
- Pressure Water System for Campers – Components, Setup, Installation
- Pressure Water Pump in a Motorhome – Installing and Connecting It Correctly
- Installation Guide Hot Shower Kit 2.0
(Drinking Water) Hoses
Water hoses (please with drinking water certification if you want to cook with / drink the water) are of course also immensely important for completing your water system.
Here you get drinking water hoses in red and blue for the hot and cold water lines of your system, respectively.
Besides the components mentioned in this article, the tigerexped shop of course has everything else you need for the technical build-out of your camper or motorhome. If you have further questions, our support team is happy to help!
Did this article help you? Then feel free to share it with other camper builders!
These topics around camper builds might also interest you:


